


Starting a business process mapping project is a significant undertaking. It involves taking a close look at how work actually happens within an organization and documenting it in a structured way. When done correctly, this exercise reveals inefficiencies, clarifies roles, and sets the stage for sustainable improvement. This guide focuses on the Business Process Model and Notation (BPMN) standard, a language designed to make workflows understandable to both technical and non-technical stakeholders.
Many organizations struggle with process documentation because it is often treated as an administrative task rather than a strategic asset. To begin successfully, you need a methodical approach that prioritizes accuracy and stakeholder buy-in. This article outlines the essential steps to launch your first mapping initiative with confidence and precision.
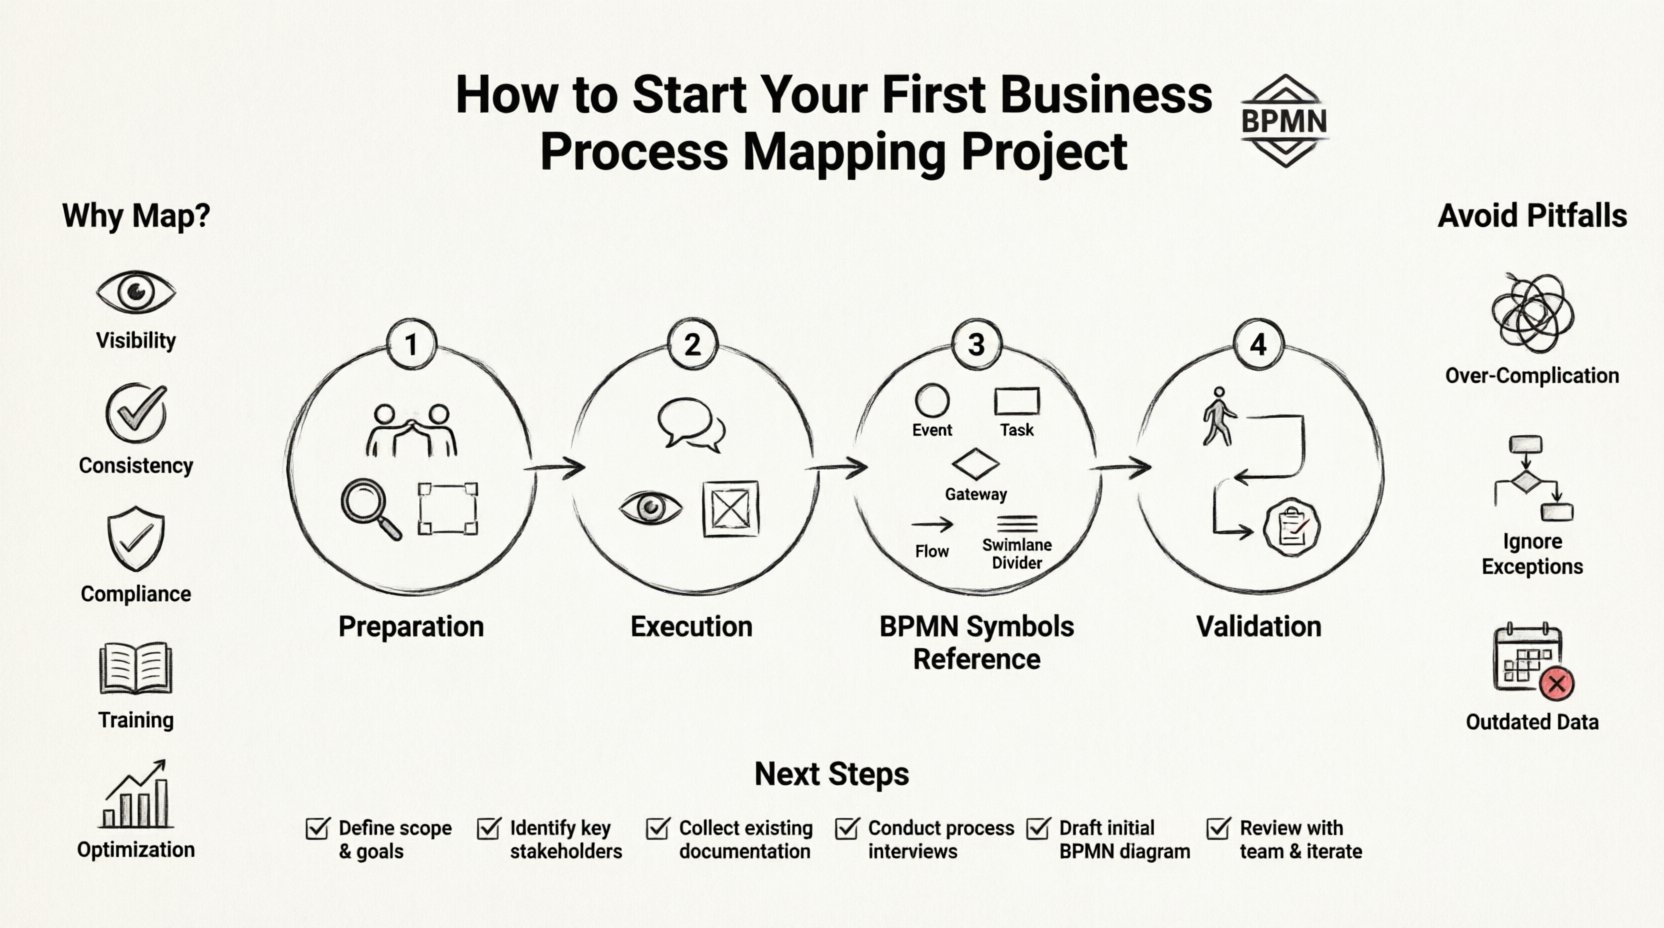
🔍 Why Map Processes Before Improving Them?
Before diving into the mechanics of drawing flowcharts, it is vital to understand the value of the exercise. You cannot improve what you do not understand. Unmapped processes are often filled with hidden dependencies, manual workarounds, and inconsistent practices that only exist in the minds of employees.
Mapping provides several tangible benefits:
- Visibility: You gain a clear picture of the end-to-end workflow, from trigger to outcome.
- Consistency: Documentation ensures that every team member follows the same procedure, reducing variability.
- Compliance: Clear records help meet regulatory requirements and audit standards.
- Training: New hires can learn the business logic faster when visual guides are available.
- Optimization: Bottlenecks and redundancies become obvious once the path is laid out on paper.
Without this foundation, any attempt to change the system risks breaking existing operations or addressing symptoms rather than root causes.
🛠️ Phase 1: Preparation and Scope Definition
The success of a mapping project often depends on the preparation phase. Rushing into drawing symbols without a plan leads to scope creep and frustration. You must define the boundaries of your project clearly.
1. Define the Scope
Do not attempt to map the entire organization at once. Select a specific process that is high-value or high-friction. Consider the following criteria:
- Frequency: Does this process happen daily, weekly, or monthly?
- Impact: Does this process affect customer satisfaction or revenue directly?
- Complexity: Is the current process confusing or prone to errors?
- Feasibility: Can you complete the mapping within a reasonable timeframe?
For a first project, choose a contained process. For example, rather than mapping “Order Fulfillment” across the whole company, focus on “Order Processing for Domestic Clients”.
2. Identify Stakeholders
You need the people who actually do the work to validate the map. Identify the following roles:
- Process Owner: The individual accountable for the outcome of the process.
- Subject Matter Experts (SMEs): Employees who perform the tasks daily.
- Stakeholders: Managers or departments affected by the output.
Secure their commitment early. Their availability for interviews and walkthroughs will determine your timeline.
3. Gather Existing Information
Before creating new diagrams, check for existing documentation. Look for:
- Standard Operating Procedures (SOPs)
- Previous audit reports
- Training manuals
- Legacy flowcharts
These documents provide a baseline. However, be aware that written instructions often differ from actual practice. The goal is to capture the “as-is” reality, not just the “should-be” theory.
📝 Phase 2: The Mapping Execution
Once preparation is complete, you move to the execution phase. This involves gathering data, drafting the diagram, and validating it with the team.
1. Conduct Interviews and Observations
Do not rely solely on what people tell you. Watch the work happen. Interview stakeholders using open-ended questions:
- What triggers this process?
- Who receives the output?
- What happens if something goes wrong?
- Are there any manual handoffs between systems?
Document every decision point. Pay attention to exceptions. Most standard diagrams show the “happy path” (the ideal scenario), but real business is full of exceptions.
2. Choose the Level of Detail
BPMN allows for different levels of abstraction. You must decide how deep to go.
- High Level (L1): Shows major phases. Good for executive summaries.
- Mid Level (L2): Shows major activities and sub-processes. Good for department heads.
- Low Level (L3): Shows individual tasks and system interactions. Good for operators.
For a first project, a Mid Level map is usually sufficient. It provides enough detail to identify issues without becoming overwhelming.
3. Draft the Diagram
Use a modeling tool to draw the process. While the specific software does not matter, ensure it supports the BPMN standard. Start with the Start Event and draw the flow logically. Use swimlanes to assign responsibilities. Swimlanes clearly show who is responsible for each activity.
Keep the diagram clean. Avoid crossing lines where possible. If the process is complex, use sub-processes to encapsulate detailed logic within a single box.
📊 Phase 3: Understanding BPMN Symbols
BPMN is a standard language. Using the correct symbols ensures that anyone can read the map. Below is a reference guide for the core elements you will encounter.
| Symbol Type | Name | Function |
|---|---|---|
| ⚪ Circle | Event | Represents something that happens (Start, Intermediate, End). |
| 🟦 Rectangle | Task / Activity | Represents specific work performed by a user or system. |
| 🔳 Subprocess | Sub-Process | Represents a nested process within a larger flow. |
| 💠 Diamond | Gateway | Represents a decision point or branching logic. |
| ➡️ Arrow | Sequence Flow | Shows the order of activities. |
| 📄 Document | Data Object | Represents information being created or consumed. |
Understanding these elements is critical. For instance, using a Gateway incorrectly can change the logic of the entire workflow. A parallel gateway splits a flow into multiple simultaneous paths, while an exclusive gateway chooses one path based on a condition.
✅ Phase 4: Validation and Review
A map that is not verified is just a guess. Validation is the most important step for accuracy.
1. Walkthroughs
Schedule a session with the Subject Matter Experts. Walk them through the diagram step-by-step. Ask them to trace the path from start to finish. Watch for hesitation or confusion.
2. Identify Gaps
During the walkthrough, look for:
- Missing tasks that were verbally mentioned but not drawn.
- Incorrect dependencies between tasks.
- Unassigned responsibilities in the swimlanes.
- Missing exception paths.
3. Sign-off
Once the team agrees the map matches reality, obtain formal sign-off. This document becomes the baseline for any future analysis or improvement.
⚠️ Common Pitfalls to Avoid
Even experienced analysts make mistakes. Being aware of common errors can save time and resources.
- Over-complicating the Diagram: Avoid using every possible BPMN symbol. Stick to the basics unless the complexity demands otherwise.
- Ignoring the Exceptions: If you only map the perfect scenario, the map will fail in real-world testing.
- Lack of Context: Ensure the map explains what the process does, not just how it flows. Add a preamble or description.
- Outdated Data: Processes change. Schedule regular reviews to ensure the map remains accurate.
- Technical Focus: Do not focus so much on the symbols that you lose the business logic. The goal is understanding, not just drawing.
🔄 Maintenance and Iteration
A process map is a living document. Once the project is complete, the work is not entirely done. You must plan for maintenance.
Assign a steward for the process map. This person is responsible for updating the diagram when the process changes. Without this accountability, the documentation will quickly become obsolete.
Consider how the map will be stored and accessed. If it is locked in a file that no one can find, it adds no value. Use a central repository where stakeholders can view the current version.
📈 Moving Forward with Analysis
With a validated “as-is” map, you are ready to analyze for improvements. You can now measure cycle times, identify bottlenecks, and calculate costs. This analysis forms the basis of the “to-be” process design.
Do not rush to redesign immediately. Ensure you fully understand the constraints of the current environment. Sometimes, the most effective improvement is simply removing a redundant approval step or clarifying a confusing instruction.
By following this structured approach, you build a foundation for continuous improvement. The skills you gain in mapping will transfer to other projects, making your organization more agile and efficient.
🏁 Summary of Next Steps
- ✅ Select a high-value, manageable process.
- ✅ Gather the team and define the scope.
- ✅ Observe the work and interview participants.
- ✅ Draft the diagram using standard BPMN symbols.
- ✅ Validate the map with stakeholders.
- ✅ Store the document and assign maintenance ownership.
Starting a business process mapping project requires discipline and attention to detail. It is not about creating pretty pictures; it is about creating a shared understanding of how work gets done. With the right preparation and adherence to the BPMN standard, you can transform complex workflows into clear, actionable assets.
Begin today. Select your first process, gather your team, and start drawing. The clarity you seek is waiting to be revealed.

