


Creating a visual representation of your customer’s experience is one of the most effective ways to understand your business from the outside in. A Customer Journey Map outlines every interaction a person has with your brand, from the moment they discover you to the point where they become a loyal advocate. This guide provides a streamlined approach to building your first map quickly, ensuring you focus on the most critical insights without getting bogged down in unnecessary details.
By dedicating just 30 minutes to this exercise, you can uncover hidden friction points and identify opportunities to improve satisfaction. We will walk through the essential steps required to visualize the path your customers take, using simple tools and structured thinking.
Why Invest Time in Journey Mapping? 🤔
Before diving into the mechanics, it is important to understand the value. A journey map is not just a diagram; it is a strategic asset. It shifts the perspective from internal processes to external experiences. Here are the core reasons to create one:
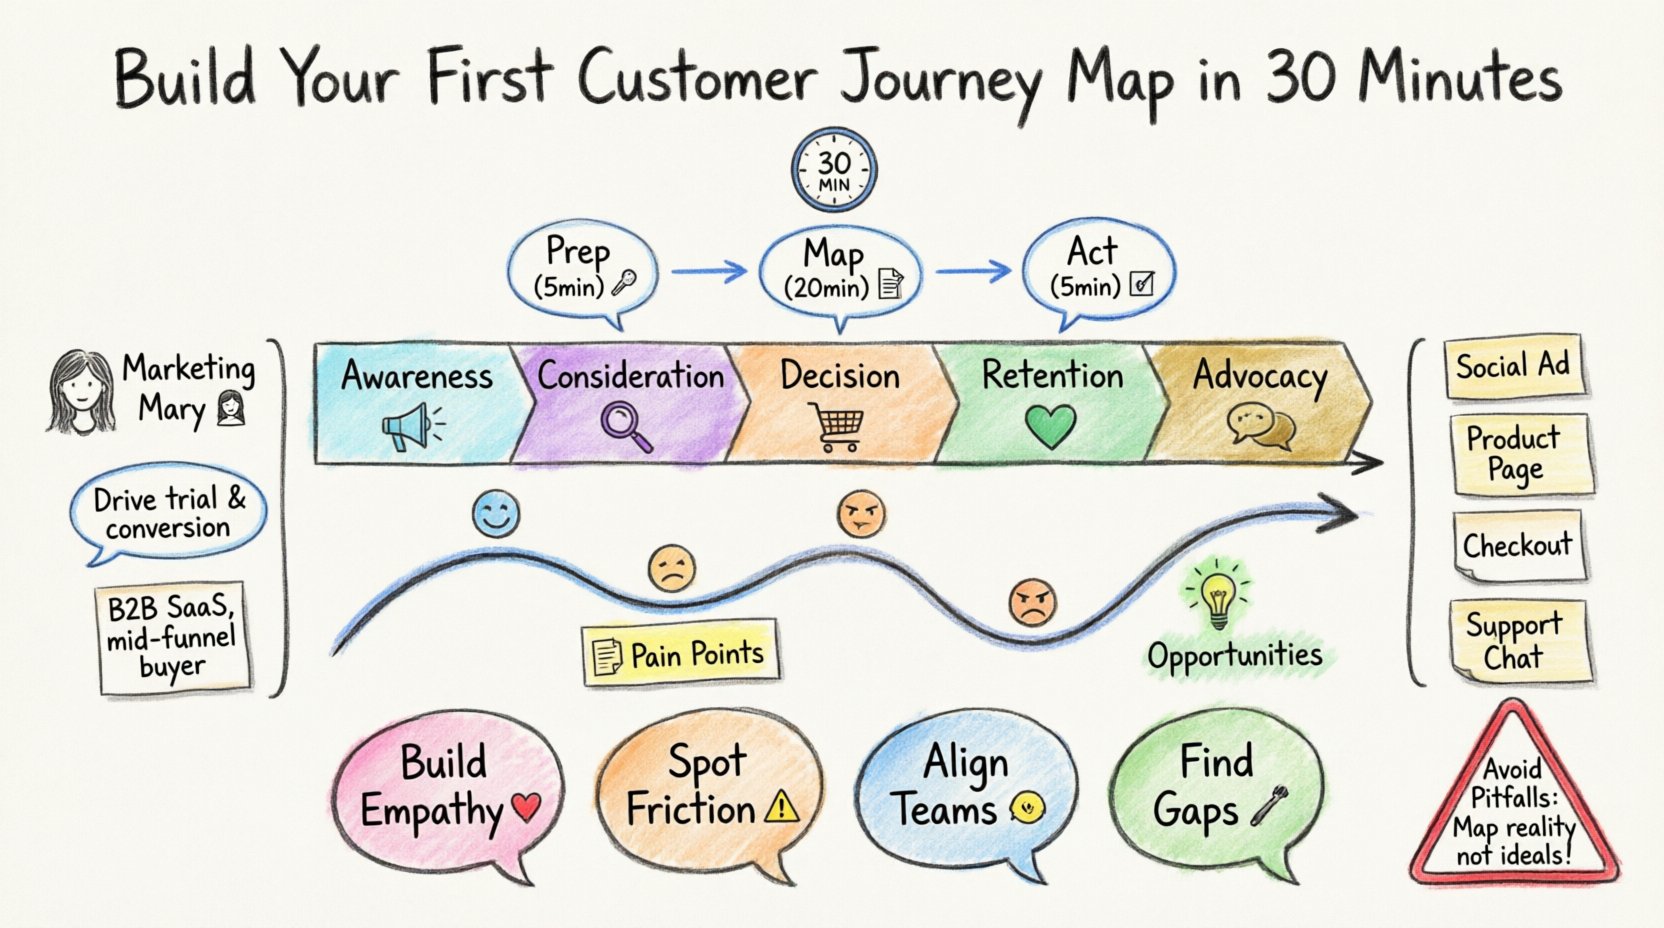
- Empathy Building: It forces stakeholders to step into the customer’s shoes, revealing emotional states at various stages.
- Friction Identification: You can visually spot where customers get stuck, frustrated, or confused.
- Alignment: It creates a shared understanding across departments like sales, support, and marketing.
- Gap Analysis: It highlights the difference between the current experience and the desired experience.
When teams align on a single view of the customer, decision-making becomes faster and more accurate. This alignment is crucial for long-term growth and retention.
Phase 1: Preparation (5 Minutes) 🛠️
To complete this exercise in 30 minutes, you must prepare beforehand. Rushing through the setup will lead to a shallow output. Gather the following resources:
- A Whiteboard or Digital Canvas: Physical space or a shared digital board where everyone can see the work.
- Sticky Notes: Different colors for different types of data (e.g., blue for facts, yellow for pain points).
- Data Sources: Access to analytics, customer support logs, or survey results.
- Key Stakeholders: Representatives from sales, product, and support.
Ensure everyone involved understands the goal: to map the current state, not the ideal state. This distinction is vital for identifying real problems.
Phase 2: The 5-Step Mapping Process (20 Minutes) 📝
Follow this structured workflow to build your map efficiently. Do not spend more than 4 minutes per step to stay within the time limit.
Step 1: Define Your Persona 👤
A journey map must be tied to a specific user profile. You cannot map “everyone” effectively. Select one primary persona based on your most valuable or most common customer type.
- Name: Give them a name (e.g., “Marketing Mary”).
- Goal: What is the main reason they are interacting with your business?
- Context: What is happening in their life when they reach out?
Write this information at the top of your map. This keeps the team focused on a single narrative throughout the exercise.
Step 2: Map the Stages 🔄
Divide the journey into broad chronological phases. While every business is different, most journeys follow a standard progression. Use the following framework:
- Awareness: The customer realizes they have a problem or need.
- Consideration: They evaluate potential solutions, including yours.
- Decision: They choose to purchase or sign up.
- Retention: They use the product or service.
- Advocacy: They recommend you to others.
Draw a horizontal line across your canvas. Label these sections clearly. This creates the backbone of your map.
Step 3: Identify Touchpoints 📍
A touchpoint is any point of contact between the customer and your brand. These can be digital, physical, or human interactions. List every touchpoint within each stage.
| Stage | Example Touchpoints | Channel Type |
|---|---|---|
| Awareness | Social Media Ad, Blog Post, Word of Mouth | Online |
| Consideration | Product Page, Demo Request, Email Newsletter | Online |
| Decision | Checkout Page, Sales Call, Contract Signature | Online/Offline |
| Retention | Onboarding Email, Customer Support Chat, App Login | Online |
Place sticky notes on the timeline for each touchpoint. Be exhaustive. If a customer interacts with you via a phone call or a physical receipt, include it.
Step 4: Capture Emotions and Pain Points 😓
This is the most critical part of the map. You need to understand how the customer feels at each touchpoint. Use a scale from 1 (Very Frustrated) to 5 (Very Satisfied).
- Ask Questions: “What is the customer worried about here?” or “What do they hope to achieve?”
- Use Data: Refer to support tickets or reviews to validate assumptions. If 30% of users drop off at the checkout page, that is a major pain point.
- Visualize: Draw a line graph underneath the timeline to show emotional highs and lows.
Highlight any dip in the emotional curve. These are the moments where you lose trust or interest. These are the areas that require immediate attention.
Step 5: Pinpoint Opportunities 💡
Once the current state is mapped, look for gaps between the customer’s needs and your current offering. Ask these questions:
- Where is the process unnecessarily complex?
- Is there information missing that the customer needs?
- Can we automate a task to reduce friction?
- Are we ignoring a channel the customer prefers?
Write these opportunities on green sticky notes. These become your backlog of improvements for the next sprint.
Phase 3: Analysis and Next Steps (5 Minutes) 📊
After 30 minutes, you will have a visual draft. Do not leave the session without assigning ownership. A map without action is just a drawing.
- Review the Data: Do the insights align with your analytics? If not, investigate why.
- Assign Owners: Who is responsible for fixing the friction points identified in Step 5?
- Share the Map: Distribute the image to the wider organization so everyone sees the customer experience.
- Set a Review Date: Customer journeys change. Plan to revisit this map in 90 days.
Common Pitfalls to Avoid ⚠️
Even with a structured approach, mistakes can happen. Be mindful of these common errors:
- Mapping the Ideal State: Do not map what you want to happen. Map what is happening. This ensures you solve real problems.
- Ignoring Internal Processes: Sometimes the friction is on your side. If a customer waits 5 days for a reply, that is part of their journey, even if it is due to internal staffing.
- Too Many Personas: Stick to one primary persona for this first map. Trying to cover everyone at once dilutes the insights.
- Lack of Data: Do not rely solely on guesswork. Use available data to back up your emotional assumptions.
- Forgetting Mobile: Ensure you consider how the journey looks on a smartphone, not just a desktop.
Detailed Example: E-Commerce Scenario 🛍️
To clarify the process, consider a hypothetical online clothing store. Here is how the data might look for the “Consideration” stage.
Persona: Busy Bob
Goal: Find a winter coat quickly before it gets too cold.
| Touchpoint | Action | Emotion (1-5) | Pain Point |
|---|---|---|---|
| Google Search | Searches for “warm coat online” | 4 | None |
| Homepage | Lands on main page | 3 | Too many banners distract from search |
| Product Page | Looks at coat details | 2 | Size chart is unclear; images are small |
| Cart | Adds item to bag | 3 | Shipping cost revealed too late |
In this scenario, the clear opportunity is to improve the product page visuals and clarify shipping costs earlier in the funnel. This specific insight drives a concrete action plan.
How to Sustain Your Journey Map 🔄
A journey map is a living document. It requires maintenance to remain useful. Here is how to keep it relevant over time.
- Regular Updates: Update the map whenever a new feature launches or a process changes.
- Customer Feedback: Continuously feed real customer quotes into the map. This keeps the emotional data fresh.
- Departmental Syncs: Use the map as an agenda item for monthly team meetings to track progress on identified opportunities.
- Segmentation: As your business grows, you may need separate maps for different customer segments (e.g., Enterprise vs. SMB).
Frequently Asked Questions ❓
What is the difference between a Customer Journey Map and an Empathy Map?
An Empathy Map focuses on a specific moment in time, detailing what a persona says, thinks, does, and feels. A Customer Journey Map spans a longer timeline, showing the sequence of interactions. You can use an Empathy Map to inform a specific section of a Journey Map.
How do I get buy-in from leadership?
Focus on the business outcomes. Explain how fixing friction points leads to higher conversion rates and lower support costs. Use data from the map to justify the investment in improvements.
Can I do this remotely?
Yes. Use a shared digital whiteboard that allows real-time collaboration. Ensure all team members have access to the same data sources before the session begins.
How often should I update the map?
Review it quarterly at a minimum. Major product changes or shifts in market conditions may require an immediate update.
What if we don’t have data?
Start with assumptions based on interviews. Label them as assumptions and plan to validate them with data later. It is better to have a draft map than no map at all.
Final Thoughts on Customer Experience 🌟
Building a customer journey map is a foundational step toward creating a customer-centric culture. It moves the conversation from internal metrics to external value. By spending just 30 minutes to outline this path, you equip your team with the clarity needed to make better decisions.
Remember, the goal is not perfection. The goal is progress. Start with the current state, identify the biggest friction points, and begin fixing them. Over time, these small improvements will compound into a significantly better experience for everyone who interacts with your brand.
Keep the map visible. Keep the team aligned. And always listen to what your customers are telling you through their actions.

