


Creating a clear picture of how your customers interact with your brand is essential for growth. A customer journey map visualizes the entire process, from the first moment of awareness to long-term loyalty. However, starting from scratch can feel overwhelming. This is where templates come in handy. They provide structure and ensure you do not miss critical details.
This guide offers a plain-language reference for new strategists. We will explore the anatomy of a map, the different types of templates available, and how to use them effectively without relying on complex jargon. By the end, you will understand how to build a map that drives real decisions.
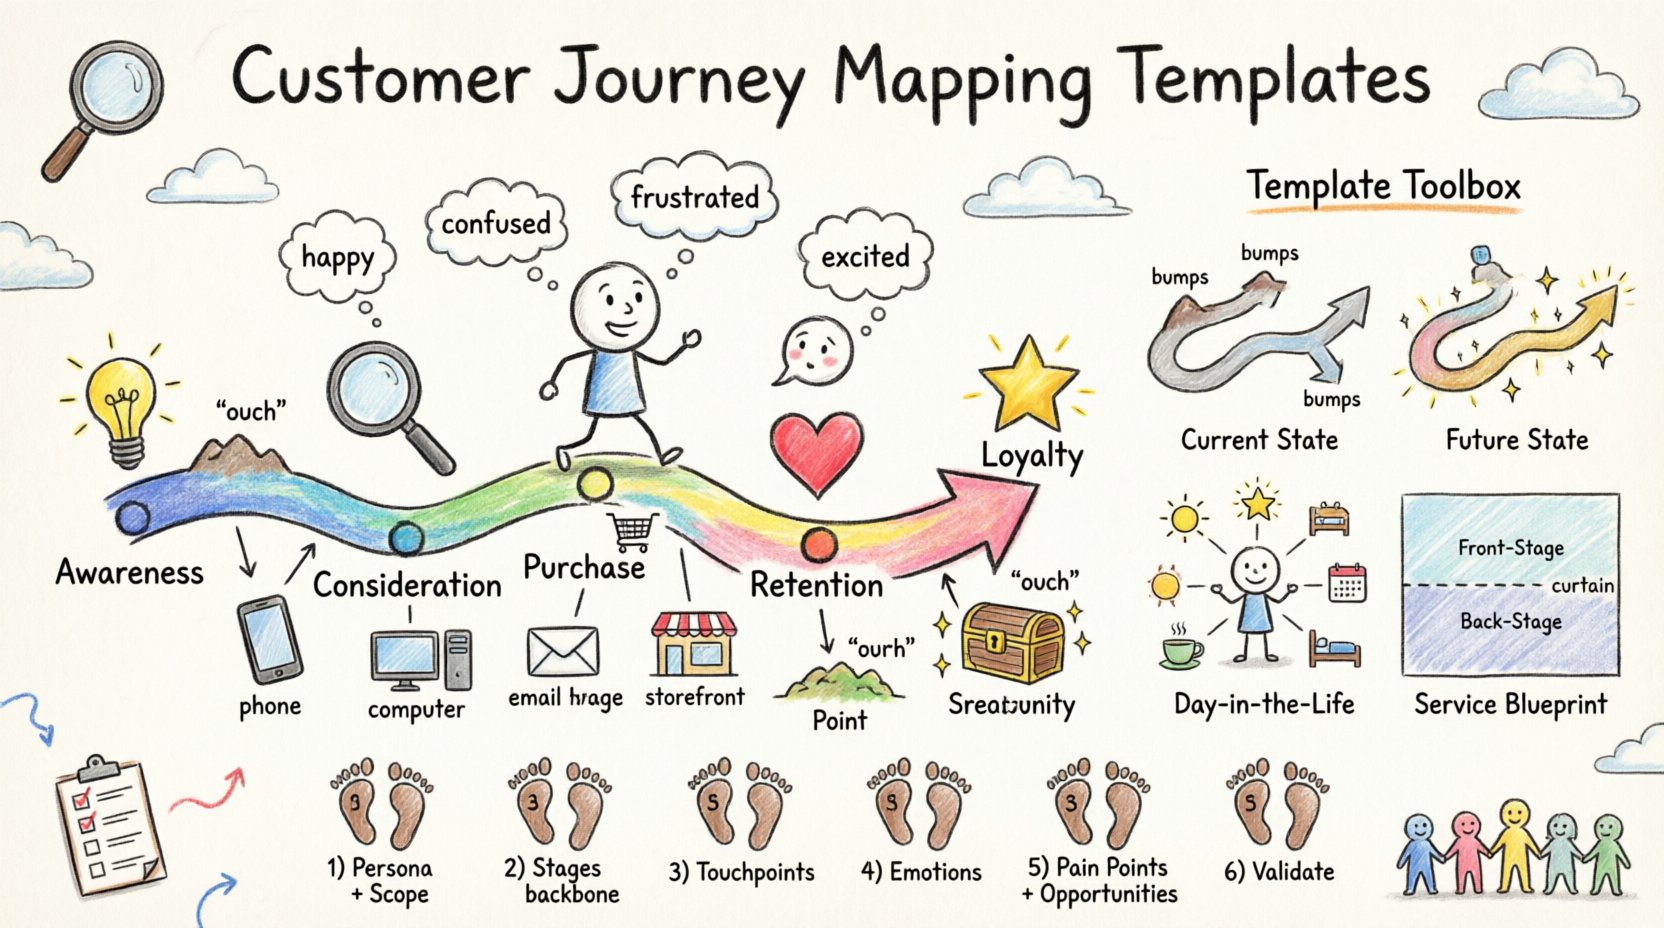
Understanding the Core Components of a Journey Map 🧩
Before selecting a template, it is vital to understand what makes a map valid. A journey map is not just a timeline; it is a story of human experience. Every map should contain specific elements to be useful.
- Persona: Who is experiencing this journey? Is it a new user, a returning customer, or someone facing an issue?
- Stages: The high-level phases the user goes through, such as Awareness, Consideration, Purchase, and Retention.
- Touchpoints: The specific moments of interaction, like visiting a website, calling support, or opening an email.
- Emotions: How does the user feel at each stage? This is often tracked on a curve or scale.
- Channels: Where does the interaction happen? Is it mobile, desktop, in-person, or via social media?
- Pain Points: Where does friction occur? What stops the user from moving forward?
- Opportunities: What can be improved to enhance the experience?
When you use a template, these components are usually pre-arranged. This allows you to focus on the data rather than the layout.
Why Use Templates Instead of Blank Sheets? 📄
New strategists often wonder if they should draw their own diagrams. While custom designs have their place, templates offer distinct advantages for consistency and speed.
1. Ensuring Consistency Across Teams 🤝
If you have multiple teams mapping different journeys, using a standard template ensures everyone is looking at the same data structure. This makes comparing different maps easier.
2. Saving Time on Setup ⏱️
Setting up a grid, defining axes, and labeling sections takes time. Templates remove this administrative burden so you can focus on research and insights.
3. Facilitating Collaboration 🗣️
When a stakeholder sees a familiar layout, they can engage with the content faster. They do not need to guess what the columns mean.
4. Preventing Scope Creep 🚫
A template forces you to define the boundaries of the map. It prevents you from trying to map the entire company history instead of a specific customer flow.
Common Types of Journey Map Templates 🛠️
Different goals require different layouts. A simple awareness map looks different from a service blueprint. Below is a breakdown of the most common structures used by strategists.
1. The Current State Map
This maps the journey as it exists right now. It is factual and based on observed behavior. It is the best starting point for identifying immediate problems.
- Focus: Reality and friction.
- Best For: Auditing existing processes.
2. The Future State Map
This maps the ideal journey. It shows where the customer should go if all improvements are implemented. It serves as a target for the product and service teams.
- Focus: Vision and goals.
- Best For: Strategic planning and roadmapping.
3. The Day-in-the-Life Map
This looks beyond the brand to include the user’s broader context. It considers what the user is doing, thinking, and feeling outside of your direct touchpoints.
- Focus: Contextual habits and external influences.
- Best For: Understanding deep needs and motivations.
4. The Service Blueprint
This connects the customer journey to the backend processes. It shows the front-stage actions (what the user sees) and the back-stage actions (what your team does).
- Focus: Operational feasibility and support systems.
- Best For: Aligning internal teams with customer needs.
| Template Type | Primary Goal | Data Needed | Complexity |
|---|---|---|---|
| Current State | Identify Friction | Observational Data, Analytics | Low |
| Future State | Define Vision | Strategy, Ideation | Medium |
| Day-in-the-Life | Understand Context | Interviews, Ethnography | High |
| Service Blueprint | Align Operations | Internal Process Maps | High |
Step-by-Step Guide to Filling a Template 📝
Having the blank structure is only half the battle. The value comes from populating it with accurate information. Follow this process to ensure your map is robust.
Step 1: Define the Scope and Persona 🎯
Start by writing down who this map is for. A journey for a first-time buyer is different from a journey for a corporate renewal. Write the persona name at the top. Define the specific scenario. For example, “Purchasing a laptop for the first time” is better than just “Buying a laptop”.
Step 2: Map the Stages (The Backbone) 🦴
Fill in the horizontal axis with the standard stages. Use labels like:
- Awareness: The user realizes they have a problem.
- Consideration: The user evaluates options.
- Decision: The user makes the purchase.
- Retention: The user uses the product.
- Loyalty: The user advocates for the brand.
Adjust these labels to match your industry. A subscription service might use “Onboarding” instead of “Decision”.
Step 3: Identify Touchpoints and Channels 📱
List every interaction in each stage. Be specific. Instead of “Website”, write “Landing Page” or “Checkout Screen”. Instead of “Support”, write “Chat Bot” or “Phone Call”. This granularity helps in troubleshooting later.
Step 4: Capture User Thoughts and Emotions 💭
Ask yourself what the user is thinking. Are they confused? Excited? Frustrated? Use quotes from real customer interviews if possible. If you do not have interviews, use data or logical inference based on the scenario.
Step 5: Document Pain Points and Opportunities 🚧
This is the most critical part. Mark where the user hits a wall. Is the form too long? Is the price unclear? Once you find the wall, write down the opportunity. For example, “Simplify form fields to reduce drop-off”.
Step 6: Validate with Data and Stakeholders ✅
Do not leave the map in your head. Share it with customer support, sales, and product teams. Ask them if the map reflects reality. Validate emotional claims with survey data or heatmaps.
Data Collection Methods for Accurate Maps 📊
A map is only as good as the information inside it. Avoid assumptions. Use these methods to gather the raw material for your template.
1. Customer Interviews
One-on-one conversations provide deep qualitative data. Ask open-ended questions about their recent experience. Listen for emotional language.
2. Analytics Review
Look at where users drop off. High exit rates on a specific page indicate a friction point that needs to be mapped.
3. Support Ticket Analysis
Read through common complaints. These are direct indicators of where the current journey fails.
4. Usability Testing
Watch users try to complete tasks. Record where they hesitate or make errors.
5. Surveys
Use NPS or CSAT surveys to get quantitative scores on specific stages of the journey.
Integrating Internal Perspectives 🏢
A journey map is not just about the customer; it is also about the organization. Internal teams often have a different view of the process than the customer does.
- Sales Teams: Know what objections customers raise most often.
- Support Teams: Know what the most confusing parts of the product are.
- Product Teams: Know what features are being built and why.
- Marketing Teams: Know how the brand message is being communicated.
When you build the map, invite representatives from these groups. They can add notes to the “Behind the Scenes” row of a service blueprint template. This ensures the future state is actually achievable.
Common Mistakes to Avoid 🚫
Even with a template, errors happen. Here are the most frequent pitfalls to watch out for.
1. Mapping the Ideal Instead of the Real
It is tempting to draw how you want the process to work rather than how it does work. Start with the Current State. Only move to the Future State after you have fixed the problems.
2. Too Many Personas
Do not try to map every single user type in one document. It becomes cluttered and unusable. Create separate maps for distinct segments.
3. Ignoring the Emotional Curve
A map with just steps is a flowchart, not a journey map. The emotional line is what makes it a tool for empathy. Ensure you have a row dedicated to sentiment.
4. Creating It and Storing It
A map that sits in a folder is useless. Share it, print it, and pin it. Use it as a reference during meetings.
5. Lack of Specificity
Writing “Customer Service” is not enough. Write “Email Response Time”. Specificity allows you to assign ownership and measure improvement.
Measuring the Impact of Your Mapping Efforts 📈
How do you know if your journey mapping is working? You need to track the changes that result from the insights.
- Conversion Rates: Did the drop-off at the checkout stage decrease?
- Customer Satisfaction (CSAT): Did scores improve after fixing friction points?
- Time to Resolution: Did support tickets take less time to close?
- Employee Adoption: Are teams using the map to guide decisions?
Set baseline metrics before you start. Compare them six months after implementing changes derived from the map.
Frequently Asked Questions ❓
Here are common questions new strategists ask about using templates.
How many stages should a journey map have?
There is no fixed number. Five to seven stages is common. More than that can become too granular, while fewer than three might miss key transitions.
Do I need software to make a map?
No. You can use paper, sticky notes, or a spreadsheet. Digital tools are helpful for collaboration, but the methodology matters more than the medium.
How often should I update the map?
Update it whenever a major change happens. This includes new product launches, rebranding, or significant shifts in customer behavior. A good rule of thumb is annually.
Can a map be too long?
Yes. If it takes more than an hour to review, it is likely too complex. Focus on the critical path. Remove irrelevant touchpoints.
Next Steps for Your Strategy 🚀
Now that you have the templates and the knowledge, it is time to begin. Pick a high-value journey. One that impacts revenue or satisfaction significantly. Gather your team. Start with the Current State. Be honest about where things break.
Remember, the goal is not to create a beautiful document. The goal is to create understanding. When everyone sees the customer experience from the same perspective, alignment becomes easier. Decisions become faster. The customer experience improves.
Keep your templates accessible. Keep your data fresh. Keep your focus on the human behind the screen. That is the core of effective journey mapping.
Start small. Iterate often. Let the map guide your actions, not just your presentations. This practical approach ensures that your work delivers tangible value to the organization and the people you serve.
Review your progress regularly. If a map stops reflecting reality, update it. Treat the document as a living record of your relationship with your customers. This mindset shifts the map from a static artifact to a dynamic strategic asset.
By following these guidelines, you will build maps that drive real change. You will move from guessing to knowing. This foundation is what separates successful customer experience strategies from the rest.
Good luck with your mapping projects. Stay curious, stay grounded in data, and keep the user at the center of everything you do.

