


Building software is more than just writing code. It is about translating human needs into a functioning digital reality. This process involves a complex chain of events, starting from the initial spark of an idea and ending with the system running in a production environment. One of the most critical artifacts in this journey is the deployment diagram. This visual representation maps out the hardware and software architecture, showing how components interact within the physical infrastructure.
This guide walks through the practical steps required to move from gathering requirements to final deployment. We will focus on the structural integrity of the system, ensuring that the design supports stability, scalability, and security without relying on specific vendor tools.
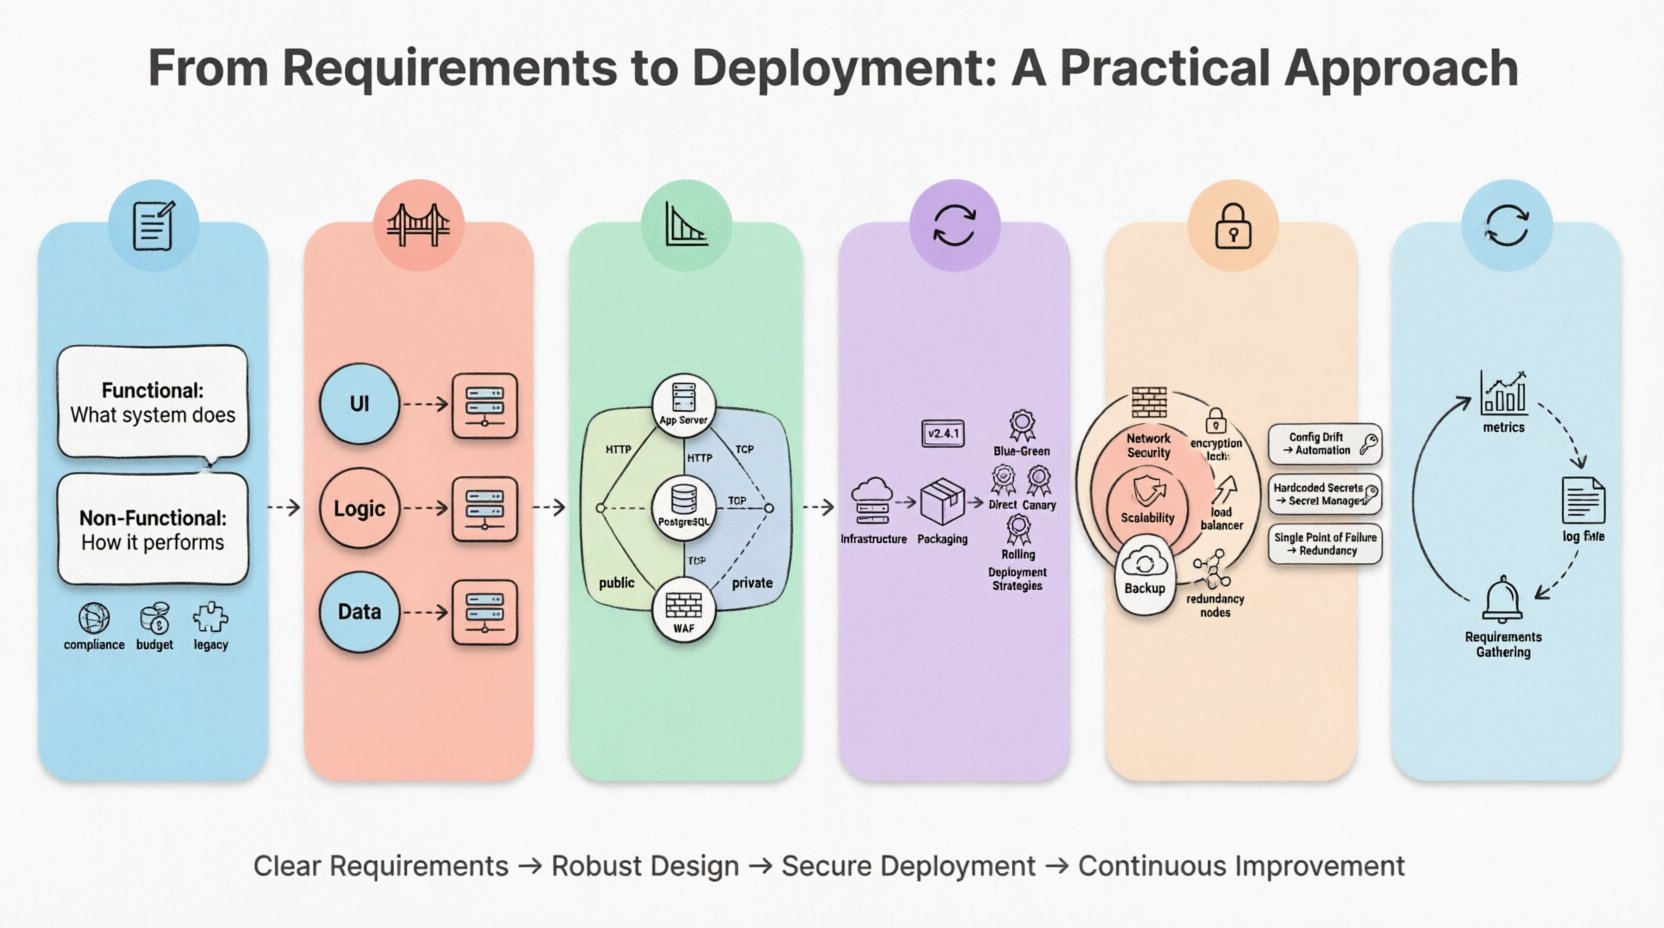
1. Understanding the Landscape: Requirements Gathering 📝
The journey begins before a single line of code is written or a server is provisioned. It starts with understanding what the system needs to achieve. Requirements are the foundation upon which the deployment architecture is built. If the foundation is weak, the structure will struggle to hold weight.
Functional vs. Non-Functional Requirements
When collecting requirements, it is essential to categorize them into two distinct groups:
- Functional Requirements: These describe what the system does. For example, “The system must process payment transactions within two seconds.” This dictates the processing power needed.
- Non-Functional Requirements: These describe how the system performs. Examples include availability, scalability, latency, and security. These are the drivers for the deployment topology.
For a deployment diagram, non-functional requirements are paramount. They determine the number of nodes, the types of connections, and the redundancy measures required.
Identifying Constraints
Every project operates within constraints. These might include:
- Compliance: Data residency laws may require certain nodes to exist in specific geographic locations.
- Budget: The cost of infrastructure influences whether you choose virtual machines, bare metal, or containerized environments.
- Legacy Integration: Older systems might require specific network protocols or physical proximity to new components.
Documenting these constraints early prevents costly redesigns later. They define the boundaries of your deployment model.
2. Bridging the Gap: Logical to Physical Design 🌉
Once requirements are clear, the next step is translating the logical architecture into a physical one. This is where the abstract becomes concrete.
The Logical View
The logical view focuses on software components. It shows modules, libraries, and services and how they communicate. It answers the question: “What software pieces are needed?”
The Physical View
The physical view answers: “Where does this software run?” This is the domain of the deployment diagram. It involves mapping the logical components onto physical computing resources.
Consider the following translation process:
- Web Interface: Moves from a “User Interface Module” to a “Web Server Node” or “Load Balancer”.
- Database: Moves from a “Data Storage Component” to a “Database Server Cluster”.
- Business Logic: Moves from a “Service Layer” to an “Application Server” or “Compute Instance”.
This mapping ensures that every software artifact has a designated home in the infrastructure. It prevents the common error of designing a system that cannot be hosted on available hardware.
3. Constructing the Deployment Diagram 📐
The deployment diagram is the blueprint for the operations team. It serves as the single source of truth for how the system is structured physically. A well-constructed diagram reduces ambiguity during the build and release phases.
Key Components of the Diagram
To create a comprehensive diagram, you must include specific elements that represent the infrastructure.
- Nodes: These represent the physical or virtual computing resources. Examples include servers, routers, firewalls, or storage devices. Each node should be labeled with its specifications (e.g., CPU, RAM, Storage) if relevant to the deployment strategy.
- Artifacts: These are the software components being deployed. Examples include executable files, libraries, database schemas, or configuration scripts. They are placed inside or on the nodes where they reside.
- Communication Paths: These lines show how nodes connect. You must specify the protocol used, such as HTTP, TCP/IP, or a secure tunnel.
- Interfaces: These indicate the entry and exit points for data. They define where the system accepts input or sends output.
Visual Hierarchy
Complex systems can become cluttered quickly. Use visual hierarchy to maintain clarity.
- Grouping: Use containers or boxes to group related nodes, such as a “Frontend Cluster” or “Data Center A”.
- Layering: Arrange nodes vertically to show the flow of data. Place client-side nodes at the top and backend storage at the bottom.
- Color Coding: Use distinct colors for different security zones (e.g., public vs. private networks) to highlight security boundaries.
Remember, the diagram is a living document. As the system evolves, the diagram must be updated to reflect changes in infrastructure.
4. The Execution Workflow: Build to Release 🔄
Once the diagram is approved, the focus shifts to execution. This is the operational phase where the design becomes reality. The workflow connects the diagram to the actual release process.
Infrastructure Provisioning
Before deployment begins, the infrastructure must exist. This step involves setting up the nodes identified in the diagram.
- Virtualization: Creating virtual machines based on the specifications defined in the physical design.
- Network Configuration: Setting up subnets, routing tables, and firewall rules to ensure nodes can communicate securely.
- Security Hardening: Applying security patches and configuring access controls before any software is installed.
Application Packaging
Software must be prepared for the environment. This involves bundling code, dependencies, and configuration files.
- Consistency: Ensure the build environment matches the deployment environment to avoid “it works on my machine” issues.
- Versioning: Every artifact must have a unique version identifier to track changes and enable rollbacks.
- Configuration Management: Externalize configuration values (like database passwords) so they can be changed without rebuilding the application.
Deployment Strategies
How you move code from staging to production matters. Different strategies suit different risk profiles.
| Strategy | Description | Best Use Case |
|---|---|---|
| Direct Deploy | Replacing old versions with new versions immediately. | Low-risk internal tools. |
| Blue-Green | Running two identical environments. Traffic switches from one to the other. | High-availability production systems. |
| Canary Release | Releasing to a small subset of users first, then expanding. | Testing new features with real traffic. |
| Rolling Update | Updating nodes one by one or in small batches. | Large-scale distributed systems. |
Choosing the right strategy minimizes downtime and reduces the impact of potential failures.
5. Infrastructure Considerations & Security 🔒
Deployment is not just about getting code running. It is about ensuring the system remains secure and performant under load. Security and performance must be woven into the deployment architecture from the start.
Network Security
Firewalls and security groups act as the perimeter defense. The deployment diagram should clearly show where these devices sit.
- Segmentation: Separate the database layer from the application layer. Do not allow direct public access to sensitive data stores.
- Encryption: Define where data is encrypted. This includes data in transit (between nodes) and data at rest (on storage disks).
- Access Control: Define who can access which nodes. Limit administrative access to secure channels.
Scalability and Performance
Infrastructure must grow with demand. The deployment model should account for scaling.
- Horizontal Scaling: Adding more nodes to handle increased load. This is often easier than vertical scaling (upgrading a single server).
- Load Balancing: Distributing incoming traffic across multiple nodes to prevent any single server from becoming a bottleneck.
- Caching: Placing caching layers between users and the database to reduce latency and load.
Backup and Recovery
Disasters happen. The deployment plan must include recovery mechanisms.
- Redundancy: Ensure critical components exist in multiple locations (availability zones).
- Backups: Schedule regular backups for all data stores. Test the restoration process periodically.
- Failover: Define what happens if a primary node fails. Automated failover ensures minimal downtime.
6. Common Pitfalls and Solutions 🛠️
Even with a solid plan, issues can arise. Understanding common pitfalls helps you navigate them effectively.
| Pitfall | Impact | Solution |
|---|---|---|
| Configuration Drift | Environments differ, causing bugs in production. | Use automated configuration management tools to enforce consistency. |
| Hardcoded Secrets | Security vulnerabilities and credential leaks. | Use secret management services. Never store passwords in code. |
| Single Point of Failure | System goes down if one component fails. | Implement redundancy and failover mechanisms in the architecture. |
| Network Bottlenecks | Slow performance due to traffic congestion. | Optimize network topology and use load balancers. |
| Outdated Dependencies | Security vulnerabilities and compatibility issues. | Implement automated scanning and regular update schedules. |
7. Maintenance and Iteration 🔄
The deployment process does not end when the system goes live. It enters a cycle of maintenance and improvement. The deployment diagram serves as a baseline for monitoring and future changes.
Monitoring
Continuous monitoring provides visibility into the health of the system.
- Metrics: Track CPU usage, memory consumption, and network traffic.
- Logs: Centralize logs from all nodes to facilitate debugging.
- Alerts: Set thresholds for automatic alerts when performance degrades.
Iterative Updates
Software is never truly finished. Requirements change, and technology evolves.
- Version Control: Keep the deployment diagram in version control alongside the codebase.
- Documentation: Update the diagram immediately after any infrastructure change.
- Feedback Loops: Use production data to inform future architectural decisions.
By treating the deployment architecture as a dynamic asset rather than a static document, you ensure the system remains robust over time.
Final Considerations for System Architects
Moving from requirements to deployment requires a disciplined approach. It demands that technical decisions align with business goals and operational realities. The deployment diagram is the bridge that connects these worlds.
By focusing on clear requirements, robust physical design, and secure execution, you build systems that are reliable and maintainable. Avoid shortcuts. Prioritize clarity in your diagrams and consistency in your processes. This practical approach reduces risk and ensures that the technology serves the people who use it.
Remember that the goal is not just to deploy software, but to deliver value. Every node, connection, and artifact should contribute to that value. Keep the diagram accurate, the security tight, and the workflow efficient. This is the path to sustainable software delivery.

